
BusinessOne is going to amaze you with it's flexibility, style and customisation options that can adapt to any corporate and portfolio presentation. It comes with 3 pre-built design variations: Construction, Medical and Technology each with it's own content block configuration and visual style.

nuModusVersus is a FREE, multi-purpose template emphasizing in K2 and bundled with all kinds of content blocks you may need: Edge to edge slideshows, feature lists, screeshots showcase, client spotlight, testimonials, blog section and more.

nuMuzik is a bold and engaging template for music and media related websites. It features magazine-style layouts and large typography that makes the content stand out with big headlines, edge-to-edge feature images and careful use of white space.
We've always put user friendlyness and ease of use above all when building our extensions. At least up to what's possible for any type of extension. Simple Image Gallery Pro was great (and still is) as a plugin that allows you to zip a bunch of files and quickly transform them to an image gallery grid. It's no wonder why the free version is one of the most popular extensions in the Joomla Extensions Directory for many years now. People hate to use tools that take more time to deal with than the actual content they're producing. If it takes you more time to upload a gallery than shooting the actual pictures, then there's a problem. And unfortunately, many gallery components in the Joomlasphere simply fail to deliver what they promise.
It's part of our "masterplan" to redefine what we consider basic functionality for any Joomla site. It started with K2 and now it's moving deeper into more specialized areas. SocialConnect is an extension that -as with all things made by JoomlaWorks- came out from a real need. And it was tested extensively for more than a year on the K2 Community, before being publicly released.

First of all, make sure you always download the latest version of AllVideos.
The following documentation applies to AllVideos version 5.0 or newer (but it should work on 4.x as well).
Installation
AllVideos comes in one unified installer for Joomla versions 1.5, 2.5 & 3.x. After you download the zip file from our homepage or the AllVideos product page, upload and install the plugin by using the Joomla installer. Navigate to:
- Extensions >> Install/Uninstall (for Joomla 1.5) or
- Extensions >> Extension Manager (for Joomla 2.5) or
- Extensions >> Manage >> Install (for Joomla 3.x)
...to install the plugin.
Finally, navigate to Extensions >> Plugin Manager (Joomla 1.5 - 2.5) or Extensions >> Plugins (Joomla 3.x) and publish the plugin. To edit the plugin parameters, simply click on its name "AllVideos (by JoomlaWorks)".
Upgrading
Follow the same procedure as above. New files will simply override the old ones when installing a newer package.
Simple Options

This is a screenshot of the plugin parameters (screenshot taken from the plugin's latest version in Joomla 3.x - parameters are identical in other Joomla versions of course). The parameters contain tooltips with more info were necessary. Usually the only things you need to change are the video dimensions.
Custom options per video
Easy, descriptive syntax for media embedding. Use: {formatORprovider}filenameORvideoID{/formatORprovider}
You can also use syntax like: {format/provider}filenameORvideoID|width|height|autoplay{/format/provider}
...where "width" and "height" are the media dimensions in pixels and "autoplay" is enabled using 1 (use 0 to disable it).
For example, a YouTube video with 600x450 dimensions that autoplays on page load would be displayed adding this plugin tag in your Joomla article (or K2 item, or Virtuemart product etc.): {youtube}he73js822|600|450|1{/youtube}
Please note that for 3rd party media providers like YouTube, Vimeo, Dailymotion, SoundCloud, etc. you can also use the entire video page URL instead of just the ID. More on ways to embed such media can be found at the end of this page.
MVC Templating
The feature trully setting apart all our plugins from any other Joomla plugin are their MVC architecture, currently available in Joomla for components and modules only. That means you can use HTML and CSS template overrides inside your Joomla template and completely change the way the plugin elements display on your website!
So you can either choose to use the versatile base styling of the plugin or simply override it (both the HTML and CSS code) by copying the plugin's folder /plugins/content/jw_allvideos/tmpl/Classic in Joomla 1.5 or the folder /plugins/content/jw_allvideos/jw_allvideos/tmpl/Classic in Joomla 2.5/3.x TO your Joomla template's /templates/YOURJOOMLATEMPLATE/html/jw_allvideos/ folder (create it if it doesn't exist), as you would with components and modules.
Whatever changes you do from now on within this folder, will completely override the plugin's output, exactly as you would with any other MVC component or module.
The good thing about MVC templating is you don't have to worry about future updates breaking your styling.
Available tags in AllVideos
Below in the table we show what video/audio formats and media providers are supported by AllVideos.
In the video/audio format sections you can see the type, path and what Joomla tag to enter wherever content plugins are supported (Joomla articles, K2 items, Virtuemart products, modules etc.). Please note that if for example you divide your video/audio folder into subfolders, then you need to specify the folder path AFTER the master (also called "root") video/audio folder path.
In plain English this means that if your video exists in images/videos/summer/trip_to_paris.mp4 and your "Local Video Folder" parameter is set to images/videos, you would simply enter {mp4}summer/trip_to_paris{/mp4}.
[NOTE: To see the table contents in full, use the scrollbar at the bottom of the post to scroll the table left and right.]
Integration with 3rd party extensions

INSTALLATION
After you download the installer for either Joomla 1.5 or for Joomla 2.5+, use the Joomla installer by navigating to:- Extensions >> Install/Uninstall (for Joomla 1.5)
- Extensions >> Extension Manager (for Joomla 2.5+)
Finally, navigate to Extensions >> Plugin Manager (in both Joomla 1.5 & 2.5+) and enable/publish the plugin. To edit the plugin parameters, simply click on its name "Simple Image Gallery (by JoomlaWorks)".
REQUIREMENTS
In order for Simple Image Gallery to function properly, please make sure that your server has PHP's GD image library installed (common webhosts have GD installed by default). Additionally, your site must meet all requirements as posed by either Joomla 1.5 or 2.5+.You also have to make sure that Joomla's /cache folder is writable, in other words, check that the permissions for this folder are 755.
HOW DOES IT WORK?
The concept is simple. You want to add image galleries inside your articles (content items)! By default there is a root folder - it's the "images/stories" folder. Now create a new folder anywhere inside this root folder, for example let's say this folder is summer_trip_to_italy and upload there all your images. Go ahead and create a new content item (or open an existing one) and simply insert {igallery}summer_trip_to_italy{/gallery}, where you want your image gallery to appear inside your text. It doesn't have to be at the end of your article, it can be anywhere you insert it inside your content item. That's it! Fire up your favorite browser, navigate to the above content item et voila! An image gallery inside your content item!If you want to create a gallery from subfolders inside the ROOT folder, simply add them like this: {igallery}folder/subfolder/othersubfolder{/gallery}. In other words, write the path to your target folder without any slashes at the beginning or the end of your path (it's added auto-magically!).
Simple Image Gallery utilizes the jQuery based "fancyBox" modal script by fancyApps, which is a more modern implentation of the famous "Lightbox" script. "fancyBox" generates the nice popups that display the original images in a gallery. Since fancyBox requires jQuery to work, if you don't already load jQuery into your Joomla site, the plugin can load it for you (and you can even select which version of jQuery to use). The plugin will not load a copy of the jQuery library in Joomla 3.x as that is already loaded by default in Joomla.
USING SIMPLE IMAGE GALLERY IN K2
K2 is able to display all "content" plugins that are used in its content boxes (introtext/fulltext). Just like any other plugin, you can Simple Image Gallery's {igallery}...{/gallery} tags within K2's introtext or fulltext blocks. If you wish to fully utilize the K2 Image Gallery options, you need to upgrade to Simple Image Gallery Pro (which offers many more features compared to this free version).MVC TEMPLATING: THE POWER TO CUSTOMIZE YOUR GALLERY LAYOUT
The feature trully setting apart most JoomlaWorks plugins from other similar Joomla plugins is their MVC architecture, currently available in Joomla for components and modules only. That means you can use HTML and CSS template overrides inside your Joomla template and completely change the way the plugin elements display on your website!So you can either choose to use the default gallery styling of the plugin (called "Classic") or simply override it (both the HTML and CSS code) by copying the plugin's /plugins/content/jw_sig/jw_sig/tmpl folder within your Joomla template's /templates/YOURJOOMLATEMPLATE/html folder, as you would with components and modules. Then simply rename the folder /templates/YOURJOOMLATEMPLATE/html/tmpl to /templates/YOURJOOMLATEMPLATE/html/jw_sig. Whatever changes you do from now on within this folder and more specifically under the subfolder named "Classic", they will completely override the plugin's output, exactly as you would with any other MVC component or module.
The above instructions use Joomla 2.5 or newer as en example. If you use Joomla 1.5, then the template files are located in the folder: /plugins/content/jw_sig/tmpl
Simple Image Gallery uses one override template (Classic) only for displaying your galleries. You can override all files or selected files from the template folder, as you would with any other MVC component or module, with the better exception that Simple Image Gallery overrides CSS files as well! That means if you copy just the main template file into your /templates/YOURJOOMLATEMPLATE/html/jw_sig, then the plugin will override that file but not the CSS files!
Below you can see the file structure of the /tmpl folder inside the plugin:
/Classic/
 |-- default.php
 |-- css
 |-- template.css
 |-- images
 |-- (contains image files currently used in the CSS files or inline)
If you maintain this structure within /templates/YOURJOOMLATEMPLATE/html/jw_sig/Classic you can override the entire plugin output!

(Joomla v1.0 based websites are no longer supported as of version 2.1+ of the Frontpage Slideshow.)
DOWNLOADING
Login to your Member Dashboard and grab the latest release from your "My Subscriptions" page. An active membership is required.QUICK INSTALLATION
- Download the file FrontpageSlideshow-v3.X.X_j1.5-2.5-3.0.zip (where X is an incremental version number).
- Login to the backend of your Joomla 1.5-2.5 website and navigate to Extensions >> Install/Uninstall (Joomla 1.5) or Extensions >> Manage (Joomla 1.6+).
- Choose to upload the zip file FrontpageSlideshow-v3.X.X_j1.5-2.5-3.0.zip (where X is an incremental version number) and the Frontpage Slideshow package will be installed and ready for your website to use.
UPGRADING
Unfortunately, there is no upgrade path from versions 2.x.x to 3.x.x of the Frontpage Slideshow. because the extension has be re-written from scratch and the database tables are changed. We recommend that you follow this process to setup the latest v3.x.x release:a) backup your site first (using e.g. Akeeba Backup)
b) note down your slideshows
c) note down your customizations on existing Frontpage Slideshow templates so you can pass them on to the updated ones included in version 3+.
To update from a 3.0.0+ version to a bigger version, all you need to do is just upload the new package over the previous one. There is no need to uninstall it first as you will lose all your slideshows. Just install on top.
JOOM!FISH SUPPORT
Since version 2.1, Frontpage Slideshow bundles all necessary "content elements" for translating slideshow contents to any language using Joom!Fish.Installing/upgrading Frontpage Slideshow will install/upgrade the Joom!Fish "content elements" as well.
If Joom!Fish was not present when you installed Frontpage Slideshow, the "content elements" did not install as well. If you add Joom!Fish on your site AFTER you installed Frontpage Slideshow, then all you have to do to add Joom!Fish support on your slideshows is to just re-install Frontpage Slideshow. Your slideshows will remain intact and the related "content elements" for Joom!Fish will now be installed.
Frontpage Slideshow cannot install the Joom!Fish "content elements" if Joom!Fish is not present. That's because these "content elements" are inside the Joom!Fish folder structure, so if Joom!Fish is not installed, well, you get the picture...
REQUIREMENTS
Everything Frontpage Slideshow requires to function properly is listed in the "Information" submenu inside the component.In general:
- In order for Frontpage Slideshow to function as intended, you need to have Joomla 1.5, 2.5 or 3.0 installed (preferably the latest version in each major release) and working properly on the right server environment as noted in Joomla requirements here.
- You also have to make sure that the folders /media/com_fpss/ and all its subfolders are writable, in other words, check that the permissions for these folders are 755 (or 777 with some hosting companies). Use the free "Admin Tools" from akeebabackup.com to correct any file permission issues.
- The GD Image Library for PHP must be installed and enabled on your server. All hosting servers usually have GD installed and enabled - if you're not sure, please ask your hosting provider to enable it. GD is used by Frontpage Slideshow to handle resizing for the images you upload on your slideshows.
DEMOS
You can see Frontpage Slideshow for Joomla running on our demo site at demo.joomlaworks.net.SETTING UP YOUR FIRST SLIDESHOW
When you install Frontpage Slideshow for the first time, a set of sample data will be installed as well. So it's very easy to understand your way around and create slideshows. Either way, here's some basic instructions to quickly setup your first slideshow:1. Make sure Frontpage Slideshow is installed.
2. Navigate to Components >> Frontpage Slideshow and then click on the "Options" toolbar button (in the top right). Set your desired settings.
3. Navigate to "Categories" and click on "New" to add a new category (slideshow). As you can see, the options in the category page are self explanatory. Once you're done, hit "Save".
4. Navigate to "Slides" in the component's menu. Click on "New" to add your first slide. Follow the numbered steps to link existing (or custom) content from your Joomla site to a slide. A slide typically consists of a title, tagline, description text and main/thumbnail image. See the "advanced" tab for settings that override your category settings. Image uploads are done using AJAX, so you will see your image in a preview before saving it. The preview is a scaled down version of the actual image so it fits the edit window. If you choose Joomla articles as your slide content source, the title, description text and slide link will be automatically populated from the original content. If you choose K2, Virtuemart, redShop or Tienda as your slide content source, the title, description text, link AND image will also be automatically populated from the original content. You can override any part of this content, except the link. If you want to create a slide that does not fetch content from within your Joomla site, just use the "custom" button.
After you're done with the slide content editing, click SAVE to save the slide and return to the "Slides" page.
Repeat this process to create more slides. All these slides will eventually make your slideshow.
5. Go to Extensions >> Module Manager. Click on "Frontpage Slideshow (by JoomlaWorks)" and open the parameters page of the module. Choose to publish the module, select which "position" you want it to appear and assign the module to some menu item (all or selected menu items). Next, edit the module's parameters. Choose the template you want your slideshow to appear through, along with the width, height and sidebar width values of the slideshow. Explore the rest of the options by reading the tooltip explanation when you hover your mouse over each parameter title. When you are done setting up the module, hit the "Save" button.
6. Go to your site. Navigate to the page (menu item) where you published the module and voila, your Frontpage Slideshow is ready!
7. Additionally, you can create new menu item pointing directly to a new slideshow. Just create a new menu item, select Frontpage Slideshow >> Slideshow as menu type and set your slideshow options. These options are identical to the module's.
CUSTOM SLIDE ORDERING
If you want to arrange a category's slides under a specific order, you need to enable "ordering" in the backend.To do so, follow these steps:
- In the "slides" list, filter a certain category from the drop down, located on the top-right, just above the slides list.
- Now you see the slides for that particular category. Hit the "Order" table header, so manual ordering is enabled.
- Re-arrange a slide by clicking, holding and moving the 4-directional arrow. You can then place the slide anywhere you want in the list of slides for that category.
MVC TEMPLATING: THE POWER TO CREATE UNIQUE SLIDESHOWS
The feature trully setting apart Frontpage Slideshow from any other Joomla slideshow system is its MVC architecture. It means you can use HTML and CSS template overrides inside your Joomla template and create a unique slideshow for your website!If you are wondering what MVC is or means, please read this for general information on Joomla MVC template overrides.
If you are comfortable with Joomla templating, here's what you need to know to create unique Frontpage Slideshow templates.
- Frontpage Slideshow comes with 8 pre-designed templates, which can be used as a starting point to design your own.
- The 8 pre-packaged templates are located in /modules/mod_fpss/tmpl/
- To override one of the pre-packaged templates, simply copy its folder to /templates/YOURJOOMLATEMPLATE/html/mod_fpss/. So if you want to override the "Movies" template, copy /modules/mod_fpss/tmpl/Movies inside the folder /templates/YOURJOOMLATEMPLATE/html/mod_fpss/ (you will first have to create the folder mod_fpss inside your /templates/YOURJOOMLATEMPLATE/html/ folder). Then you just edit the default.php and the 2 css files located in the sub-folder /css to modify the resulting slideshow. By doing this, you obviously don't have to worry about Frontpage Slideshow upgrades overriding e.g. your custom CSS settings on a pre-packaged template.
- To create a new slideshow template, the process is almost identical. In this case, you can copy one of the pre-packaged templates just to get started, but you can name the template's folder differently. The Frontpage Slideshow will "see" this new template even if it doesn't exist on the module's tmpl folder. It's what we call "on the fly" MVC templating and it's a concept we first introduced with our flagship Joomla extension, K2.
default.php (the main HTML file)
/css
|-- template_css.php (dynamic CSS file)
|-- template_css_ie.css (IE7-and-older CSS file)
/images
|-- (contains image files currently used in the CSS files)
Professionals who design/develop templates for Joomla can now fully support Frontpage Slideshow by offering pre-bundled slideshow templates in a single package.
All new or customized slideshow templates should reside inside the /templates/YOURJOOMLATEMPLATE/html/mod_fpss/ folder.
When you create a menu item linking to a slideshow (using the component view introduced in versions 3.x.x), you are basically re-using the module. That is why all slideshow templates reside in the module folder and all new templates/customizations should reside in the /templates/YOURJOOMLATEMPLATE/html/mod_fpss/ folder.
TROUBLESHOOTING
Issue: Oh no! My slideshow looks broken! Slides display one below the other! What's wrong?This usually occurs if your hosting company is not "running" PHP as a CGI module. In this case, the dynamic CSS files produced by Frontpage Slideshow are unreachable as the server responds with a "500 Internal Server Error".
Solution: just go into the module parameters (in the backend), select the "Advanced parameters" slider on the right of the screen and then switch the option "CSS inclusion method" to "Embedded (on the output of the page)". This will force the CSS to "embed" onto the output of your slideshow instead of being called as an external dynamic CSS file. Please note that this option was added in Frontpage Slideshow v2.5+.
Issue: My website's drop-down menu expands behind the slideshow!
Solution: This is an issue related to your template and not the Frontpage Slideshow. You can find a detailed explanation of the issue and the solution in our Community Forum at: http://forum.joomlaworks.net/index.php?topic=1126.0
BROWSER COMPATIBILITY
Frontpage Slideshow has been successfully tested in all major browsers. The prebundled slideshow templates are fully compatible with Firefox, Chrome, Safari, Opera and Internet Explorer version 7 and above. They also degrade nicely in Internet Explorer 6.
The following instructions apply to version 3.0.0 or newer.
Simple Image Gallery Pro supports only Joomla versions 1.5, 2.5 & 3.x.
DOWNLOADING
Login to your Member Dashboard and grab the latest release from your "My Subscriptions" page. An active membership is required.
INSTALLATION
There is 1 single file you use to install the extension, which is compatible with Joomla 1.5 to 3.x. After you download this zip file, upload and install the plugin by using the Joomla installer. Navigate to:
- Extensions >> Install/Uninstall (for Joomla 1.5)
- Extensions >> Extension Manager (for Joomla 2.5 to 3.x)
...to install the extension.
Finally, navigate to Components >> Simple Image Gallery Pro (all Joomla versions) to start editing your image galleries.
UPGRADING
Simply upload any newer version on top of the previous one you have installed on your site. The process is the same as installing the extension for the first time (as mentioned above). All your settings will be retained and any new features will be added automatically.
REQUIREMENTS
In order for Simple Image Gallery PRO to function properly, please make sure that you are running at least PHP 4 and that PHP's GD image library is installed on your server (common webhosts have GD installed by default). For the Flickr integration, PHP5 is required.
You also have to make sure that Joomla's /cache folder is writable, in other words, check that the permissions for this folder are 755 or 777. If the plugin cannot generate the thumbnails due to bad permissions, you will see a related notification.
HOW DOES IT WORK?
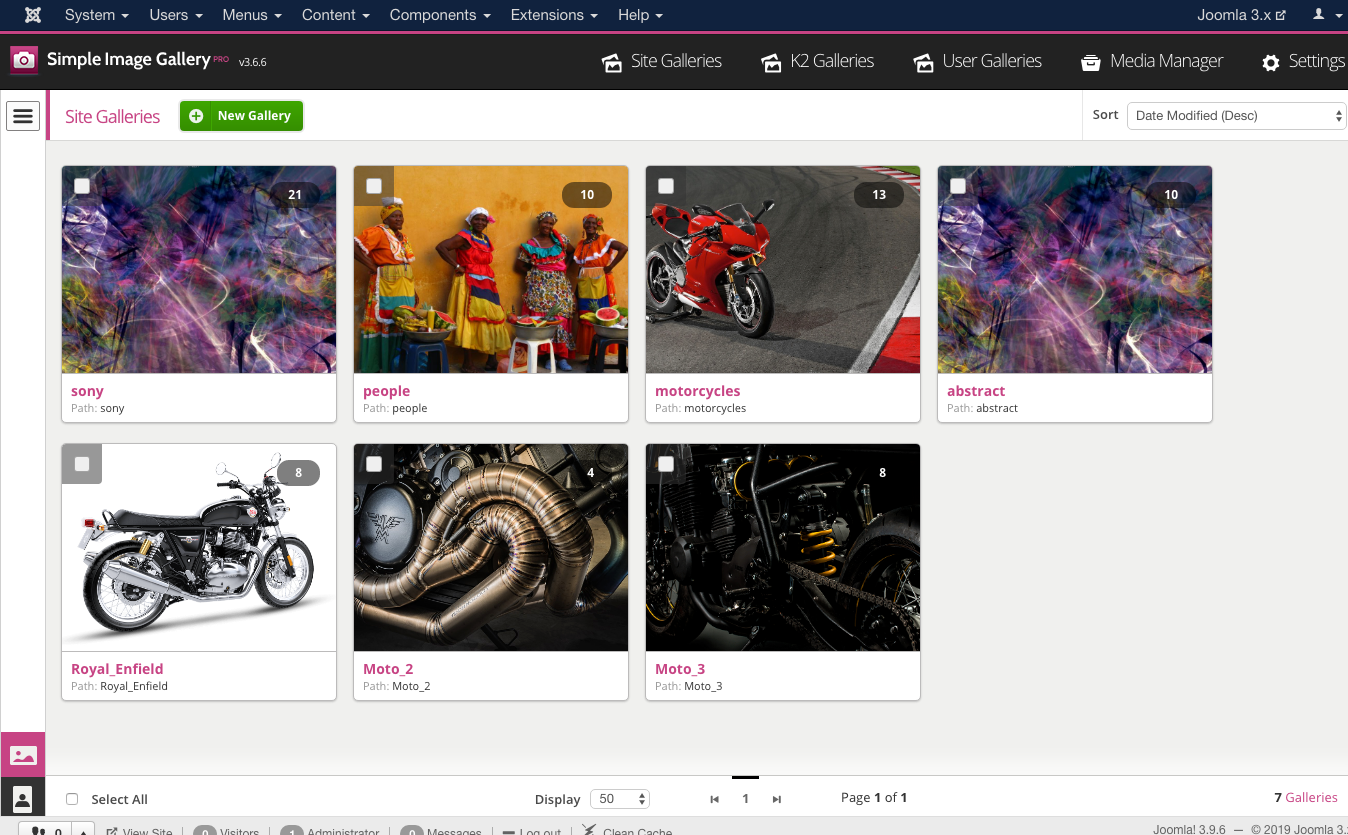
The concept is simple. You want to add image galleries inside your articles (content items)! First set the "Root folder" of all galleries in the extension's settings. By default it's the "images" folder ("image/stories" for Joomla 1.5 only). Now use the Simple Image Gallery Pro component (in the Joomla backend) to create a new gallery folder and in there start uploading images. You can optionally edit the image captions. Follow the same process to batch create your image galleries.
When you are ready to upload one of your image galleries, simply go into the Joomla article manager (or the K2 item manager, or the Virtuemart/redShop product manager etc.), locate the article/item/product you wish to add an image gallery into, place your mouse cursor where you want the image gallery to appear to inside your content (in the WYSIWYG editor) and then click on the editor plugin that reads "Simple Image Gallery Pro" at the bottom of the Joomla WYSIWYG editor. This button will trigger a lightbox popup which essentially loads the Simple Image Gallery Pro backend component and you can either choose an existing gallery to insert in your content, or you can create a new one.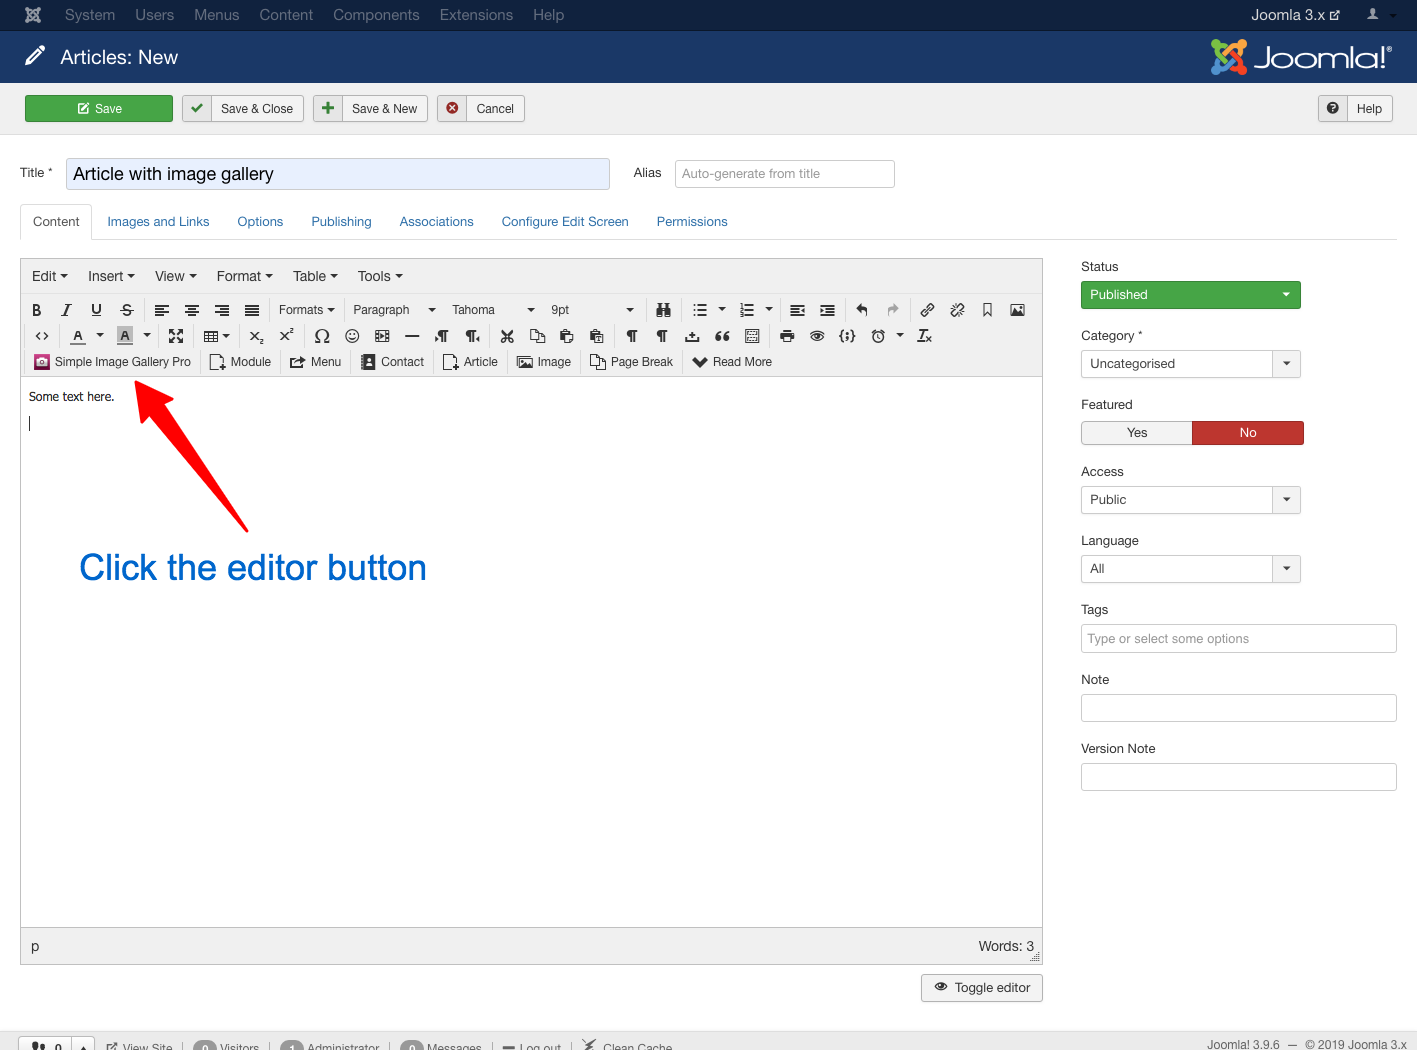
Once you insert an image gallery, you will see a plugin snippet like this: {igallery}summer_trip_to_italy{i/gallery}. This is what instructs Simple Image Gallery Pro to convert to an image gallery in the frontend (in the actual site).
You can have as many galleries as you want inside each content item, since caching takes care of performance. Thumbnails are not generated every time the page with the galleries loads, but after certain intervals, specified in the plugin parameters. The default interval (cache expiration time) is 120 minutes (2 hours). (You can see the thumbnails in your Joomla site's cache manager and you can delete the thumbnails whenever you want so they are instantly re-created upon subsequent page loads by visitors.)
Don't forget to adjust the width and height of the thumbnails. Before inserting an image gallery via the "Simple Image Gallery Pro" editor button, you can adjust these options at the bottom of the lightbox window. Decreasing the width means you are adding more thumbnails in each row of the gallery. So, experiment before going public. Also, set the image quality of the created thumbnails. Low quality means smaller thumbnail sizes and therefore better loading times for your site.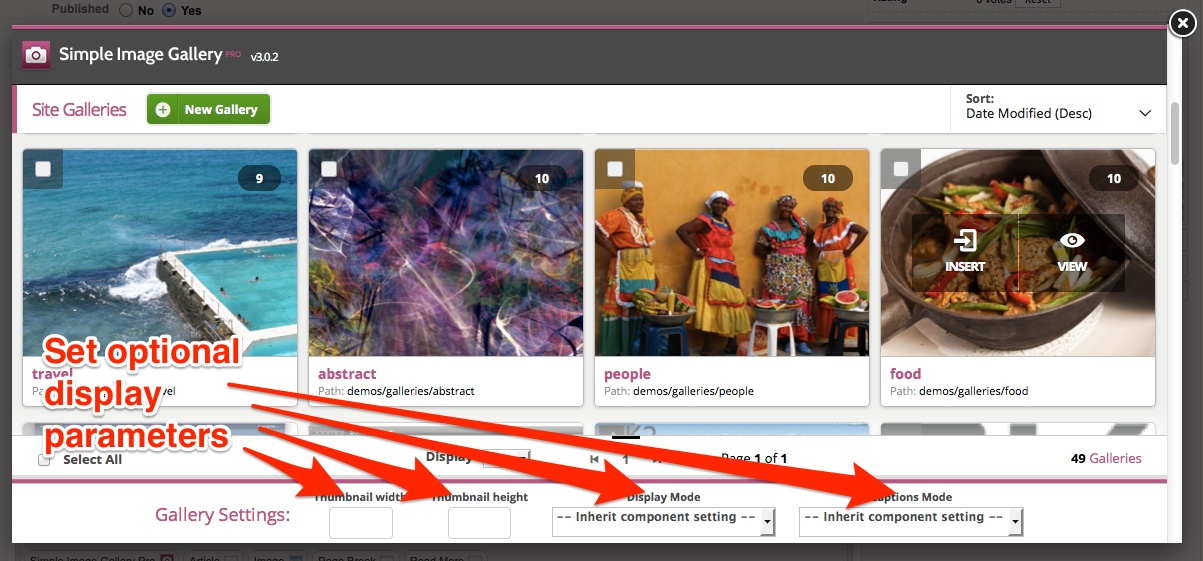
Please note that if you use K2 for your content and more specifically, if you wish to add an image gallery from the related tab in the K2 item form, you can only create, edit and select to use a gallery, but you cannot modify the gallery thumbnails dimensions as you would with galleries inserted from the plugin button. In that case, K2 galleries will inherit the global options configured in the component's settings (in the backend). Of course, you can always still use the plugin button to add galleries within content blocks either in the main content tab in the K2 item form or in WYSIWYG text blocks set in Extra Fields.
For performance issues, prefer not to use over 50 images per content item, otherwise you're just overweighing your pages. The plugin will have no problem handling the conversion, it's just that your users will wait for many thumbnails to load.
Alternatively, you can "switch" to "single thumbnail" display mode and launch your galleries from one thumbnail only! That's right! E.g. you can launch a slideshow of 50 images from a single thumbnail, without overweighing your article page with thumbnail images. The user sees all full-sized images by navigating with the "previous" and "next" buttons within the popup window! This can come handy when you want to display a sequence of images as a presentation.
Flickr Integration: A free API key is required to have Flickr photo set embedding on your site. The process to get an API key is very simple: Sign in to your Flickr account, then visit http://www.flickr.com/services/apps/create/ and choose to get a non-commercial key. Name your app as your website. You can safely use this API key on more than one websites, even on different domains.
Can frontend (registered) users upload image galleries? Frontend registered users are allowed to upload image galleries to their articles (or any other Joomla extension) by using the same process as backend users. When using the editor plugin button, frontend users can upload galleries to an automatically created user gallery folder. This prevents e.g. user "John" from seeing & modifying the galleries upload by user "Jane". Furthermore, they are not allowed to view or modify the image galleries that are uploaded from backend users typically inside the /images folder of a Joomla site. In other words, frontend gallery uploading for registered users is a sandboxed process. They can upload and manage their own galleries only. They cannot manage the galleries created by others. Please note that this "frontend user gallery uploading" feature is different from K2 frontend image gallery uploading (which is already sandboxed as a process too). This feature ONLY applies when using the editor plugin button inside a WYSIWYG editor area to upload a gallery in the frontend.
Old IE browsers and the "Polaroids" gallery layout: It is important to understand that the "Polaroids" gallery layout makes extensive use of CSS3 which is not fully supported by old versions of Internet Explorer (IE). More specifically, for IE version 6 to version 8 we use a graceful degradation approach, so that the gallery is visible and functional. Thus the layout is not identical to how modern browsers like Mozilla Firefox, Google Chrome, Apple Safari, Opera & IE9+ render the gallery. We strongly advise users whose site visitors are mostly coming from old IE versions to possibly use a different gallery layout.
GOING PRO!
Multiple "Popup" Engines
Simple Image Gallery PRO utilizes 10 popup engines for ultimate style and compatibility with various frameworks. Most are based on the jQuery JavaScript library and 2 of them can display the source image in a "responsive" modal box with a touch friendly user interface. Ideal for responsive web sites! 3 popup engines work with "vanilla" JavaScript (they don't require jQuery or any other such library) and most of the popup engines are "slideshow capable". Popup engines utilizing jQuery will download the latest library version minified from the "Google AJAX Libraries API" service, which means faster load times for your website and your gallery. You have full control over how jQuery is loaded. Please note that in Joomla 3.0 or later the extension uses the CMS's built-in copy of jQuery.
Manual Gallery Snippet Setting
"Simple Image Gallery PRO" provides the user the ability to have customized image galleries. For this to happen, you can either use the new user interface (recommended way) or you can directly use the included 6 additional "switches" (additional to the image gallery folder path), which you can use to set different width, height, display mode, caption mode, popup engine and gallery layouut per gallery! That means you can bypass the global settings "Thumbnail viewport width", "Thumbnail viewport height", "Display Mode", "Default caption (label) handling", "Popup engine for image galleries" and "Layout template for image galleries", and have for example image galleries that display thumbnails in different dimensions within the same article.
To do that you need to insert up to 6 (optional) values in the tags used by the plugin. The syntax is the following:
{igallery}folder_path:thumbs_width:thumbs_height:display_mode:caption_mode:popup_engine:gallery_layout{i/gallery}
Watch out for the seperator, which is the character ":".
- "thumbs_width" is the target width in pixels for all thumbnails.
- "thumbs_height" is the target height in pixels for all thumbnails.
- "display_mode" is the mode in which we want our gallery to display. It takes only 2 values, either "0" or "1". "0" means "normal mode" and "1" means "single thumbnail mode".
- "caption_mode" control how captions (labels) are displayed. It takes only 3 values, either "0" (no captions), "1" (caption with generic messages) or "2" (captions coming from labels.txt files).
- "popup_engine" overrides the default popup engine (see our demo site). Values are (alphabetically): highslide, jquery_colorbox, jquery_fancybox, jquery_fresco, jquery_lightview, jquery_magnificpopup, jquery_nivolightbox, jquery_prettyphoto, jquery_slimbox, jquery_swipebox, lytebox, simplebox
- "gallery_layout" overrides the default gallery layout. Values are: Artistic, Classic, Elegant, Galleria, GalleriaWhite, Polaroids, Sleek
The most important ones of course are the first 2 params (after the folder path): width & height
So if for example you want to insert an image gallery in some article with thumbnails displaying in 300px width and 160px height, while keeping the "normal" display mode (showing all thumbs, not just the first one), with caption showing generic messages, you would insert the following tag:
{igallery}folder/some_folder:300:160:0:1{i/gallery}
...which translates to: "create image gallery from the images inside 'folder/some_folder', give them a width of 300px and a height of 160px, do not display them (0) in "single thumbnail" mode and display generic captions (1) for every thumbnail.
If we did want to display the gallery in "single thumbnail" mode, then we would insert:
{igallery}folder/some_folder:300:160:1:1{i/gallery}.
If we wanted to override the popup engine and the gallery layout as well, we could use something like:
{igallery}folder/some_folder:200:80:1:2:jquery_colorbox:Galleria{i/gallery}
Important!
These values are completely optional. This means you can use: {igallery}some_folder:200:160{i/gallery} to adjust dimensions only to thumbs (no change in display mode) or even {igallery}some_folder::160{i/gallery} to adjust just the height (the width value was ommitted). If we wanted to simply switch the gallery to "single thumbnail" mode, then we would just add something like: {igallery}some_folder:::1{i/gallery}. When you don't enter one of the 3 values, it is assumed you are using the global ones. Simple, right?
Flickr Integration
Adding Flickr Sets to Joomla couldn't get any simpler than this. Just the URL of a Flickr set (e.g. http://www.flickr.com/photos/joomlaworks/sets/72157626907305094/) and paste the URL inbetween the plugin's tags like this:
{igallery}http://www.flickr.com/photos/joomlaworks/sets/72157626907305094/{i/gallery}
...and you get probably the simplest and fastest way to embed Flickr Sets in Joomla. Remember to get a Flickr API key first at http://www.flickr.com/services/apps/create/.
For more advanced overrides, all additional values/params as outlined in the previous section are also present for Flickr Set embedding, with the exception of an extra value for the count of images fetched from Flickr. Check this example:
{igallery}http://www.flickr.com/photos/joomlaworks/sets/72157626907305094/:20:200:80:1:2:jquery_colorbox:Galleria{i/gallery}
Notice one additional parameter compared to regular "uploaded" galleries? There is an image counter right after the Flickr URL. So the above example translates to:
{igallery}flickr_URL:flickr_Image_Count:thumbs_width:thumbs_height:display_mode:
caption_mode:popup_engine:gallery_layout{i/gallery}
Individual captions/labels on thumbnails and popup images
"Simple Image Gallery PRO" gives you the ability to easily set individual captions (labels) on popup images. This is a feature many people have asked for, especially photographers and other such professionals, who want to add some comment in their photos and not just have a generic message appearing. Although using EXIF data from JPEG images originally sounded like a nice idea, it soon became obvious to us the trouble in which users would get to add a few captions to their images, as well as the limitations posed (no support for GIF or PNG images). So we decided that a simple text file would do a better job. So how do you add custom captions/labels to your images?
Simply enable the related option "Default caption (label) handling" in the plugin parameters and the required xx-XX.labels.txt file (where xx-XX is your site's default language locale) for each gallery will be automatically generated with some sample text in.
To edit these captions, you can either use the component's backend interface (recommended way) or you can directly edit the captions files. Simply open and edit the xx-XX.labels.txt file of the gallery for which you want to have captions. You can freely use HTML inside the description, just make sure you have one caption per line. After you edit the xx-XX.labels.txt file for a gallery, you would end up with something like:
filename1.jpg|Trip to Italy|You can see us here in piazza di Roma
other_filename.png|caption title|and this is another caption<br />with some HTML <b>in it</b>!
trip_to_canada.gif|caption title|SIG Pro is pretty cool!
As you can easily understand, each caption is broken down to 3 parts:
- the filename (autogenerated from Simple Image Gallery PRO)
- the caption title
- the caption description
Simple Image Gallery Pro plays nice with Joom!Fish too. If you have multiple languages set in your site with Joom!Fish, the plugin will create different xx-XX.labels.txt files, using the available languages. So if your site has English and French available for example, the plugin auto-generates en-GB.labels.txt and fr-FR.labels.txt files.
In versions prior to 2.5 of the plugin, the caption files where only named labels.txt. If you have already built your caption files, you don't need to worry. The plugin can still read labels.txt files, but any new gallery created will make use of the new naming format.
MVC templates: the power to customize the look of your galleries
The feature trully setting apart all our commercial plugins from any other Joomla plugin are their MVC architecture, currently available in Joomla for components and modules only. That means you can use HTML and CSS template overrides inside your Joomla template and completely change the way the plugin elements display on your website!
So you can either choose to use the versatile base styling of the plugin or simply override it (both the HTML and CSS code) by copying the plugin's folder /plugins/content/jw_sigpro/tmpl/SomeGalleryName in Joomla 1.5 or the folder /plugins/content/jw_sigpro/jw_sigpro/tmpl/SomeGalleryName in Joomla 2.5 or newer TO your Joomla template's /templates/YOURJOOMLATEMPLATE/html/jw_sigpro/ folder (create it if it doesn't exist), as you would with components and modules. Whatever changes you do from now on within this folder, will completely override the plugin's output, exactly as you would with any other MVC component or module.
Simple Image Gallery Pro uses 6 base layouts (templates) for rendering galleries, with associated CSS, JS and IMAGES folders. You are able to override all files or selected files, as you would with any other MVC component or module, with the better exception that Simple Image Gallery overrides CSS and JS files as well, as long as you maintain the same names (template.css and behaviour.js).
Putting it all together
1. This gallery operates using the global plugin parameter settings (thumbnail dimensions set to 200x160, normal mode, generic caption messages). Tag used: {igallery}demos/galleries/abstract{i/gallery}


https://www.joomlaworks.net/blog/itemlist/date/2011?start=110#sigProIdfe6145fe10
2. This gallery has thumbs assigned to 180x100, displaying in normal mode, no caption messages. Tag used: {igallery}demos/galleries/movies2012:180:100:0:0{i/gallery}


https://www.joomlaworks.net/blog/itemlist/date/2011?start=110#sigProId36aaa233b7
3. This gallery has thumbs assigned to 200x260, displaying in single-thumbnail mode, no caption messages. Tag used: {igallery}demos/galleries/casino_royale:200:260:1:0{i/gallery}

https://www.joomlaworks.net/blog/itemlist/date/2011?start=110#sigProId73e7e854ab
As you can see here, nearby text nicely wraps around the thumbnail.
4. This gallery has thumbs assigned to 240x140, displaying in normal mode, with custom captions on (using a labels.txt file). {igallery}demos/galleries/travel:240:140:0:2{i/gallery}
-
 Bondi Beach Bondi Beach
 - Brazil - Lagoa Brazil - Lagoa
- Buenos Aires - La Boca Buenos Aires - La Boca
- Fishermen near Janitzio Fishermen near Janitzio
- Golden Gate Bridge Golden Gate Bridge
- San Francisco San Francisco
- Waterfall - Iguazu Waterfall - Iguazu
- Yosemite - El Capitan Yosemite - El Capitan
- Yosemite - Half Dome Yosemite - Half Dome


https://www.joomlaworks.net/blog/itemlist/date/2011?start=110#sigProId2ad6ad9f4e
Full demos can be found on our official demo site at: http://demo.joomlaworks.net/simple-image-gallery-pro
That's all there is to it! Please submit any comments to the related board for Simple Image Gallery PRO in our Community Forum.
Creating a new responsive layout based on Foundation's block grid.
If you are not aware of ZURB’s Foundation framework it is considered the most advanced front-end framework. You can download it or learn more about it from here although for this tutorial you are not required to download the entire framework, nor do you need to add any JavaScript scripts.
Overriding the extension
To create a new template or override an edit and existing one please refer to the “MVC templates: the power to customize the look of your galleries”.
Once you have the created or renamed the folder in templates/YOURJOOMLATEMPLATE/html/jw_sigpro/ we are ready to start.
Adding the Block grid in the CSS file
Using your favourite editor open the template’s CSS file. It is located in the /css folder. Once you have opened it, you need to add the Block Grid on top of the template file.
You can use this gist as a reference so you don not really have to download anything.
Hint: Be careful not to accidentally download and paste the entire framework. Only this small part is needed.
Explaining the block grid
The block grid has three breakpoints (stages): one for small viewports (phones), one for medium viewports (tablets), one for larger viewports (laptop and desktop computers) and 12 columns .
For smaller viewports the class small-block-grid- is used followed by the number of colums we want the layout to have.
For showing two columns the class would be small-block-grid-2 . For the medium and large viewports simply replace "small-" with "medium-" and "large-" respectively.
Example. Let’s say we wish our gallery to display 2 columns on phones, 3 columns on a tablet and 5 columns on larger devices. The classes you will need to use are:
small-block-grid-2 medium-block-grid-3 large-block-grid-5
Hint: Always start from the small- class and build up.
The HTML/PHP part (putting it together)
No significant changes are needed to the default.php file. What you need to do is:
a) Add the grid’s classes to your <ulul>element.
Example
<ul id="sigProId<?php echo $gal_id; ?>" class="sigProContainer sigProResponsive small-block-grid-2 medium-block-grid-3 large-block-grid-5<?php echo $singleThumbClass.$extraWrapperClass; ?>">
b) Remove any inline widths and replace them with a percentage based on the size you specified in the extension’s settings.
We need to add some inline styling to the <mg alt="" /> element as the example bellow:
style="background-image:url(); background-repeat: no-repeat; background-size: cover;” ..
and a padding bottom to the <a> element.
a href="/" class="sigProLink" style="width: 100%; padding-bottom:%;” ..
The code that renders the thumbnail should look like this in the end.
<a href="/<?php echo $photo->sourceImageFilePath; ?>" class="sigProLink<?php echo $extraClass; ?>" style="width: 100%; padding-bottom:<?php echo ($photo->height / $photo->width * 100); ?>%;" rel="<?php echo $relName; ?>[gallery<?php echo $gal_id; ?>]" title="<?php echo $photo->captionDescription.$photo->downloadLink.$modulePosition; ?>" data-fresco-caption="<?php echo $photo->captionDescription.$photo->downloadLink.$modulePosition; ?>" target="_blank"<?php echo $customLinkAttributes; ?>> <?php if(($gal_singlethumbmode && $count==0) || !$gal_singlethumbmode): ?> <img class="sigProImg" src="/<?php echo $transparent; ?>" alt="<?php echo JText::_('JW_SIGP_LABELS_08').' '.$photo->filename; ?>" title="<?php echo JText::_('JW_SIGP_LABELS_08').' '.$photo->filename; ?>" style="background-image: url(/<?php echo $photo->thumbImageFilePath; ?>); background-repeat: no-repeat; background-size: cover;" /> <?php endif; ?> <?php if($gal_captions): ?> <span class="sigProPseudoCaption"><b><?php echo $photo->captionTitle; ?></b></span> <span class="sigProCaption" title="<?php echo $photo->captionTitle; ?>"><?php echo $photo->captionTitle; ?></span> <?php endif; ?> </a>
You can find the complete file with all the edits here.
Final Note
This method uses percentages instead of fixed widths. The size of the thumbnails is calculated from the extension’s settings but due to the fact that the column width is not fixed, the actual size will vary from viewport to viewport. The aspect ratio will always be correct but the actual size in pixels might vary a little from your settings.
If you wish to display a fixed width thumbnail you should use another template, e.g. Elegant.
Both of the files can be found here.
Contributed Translations
3rd party contributions
The following list are contributions from Simple Image Gallery Pro users:

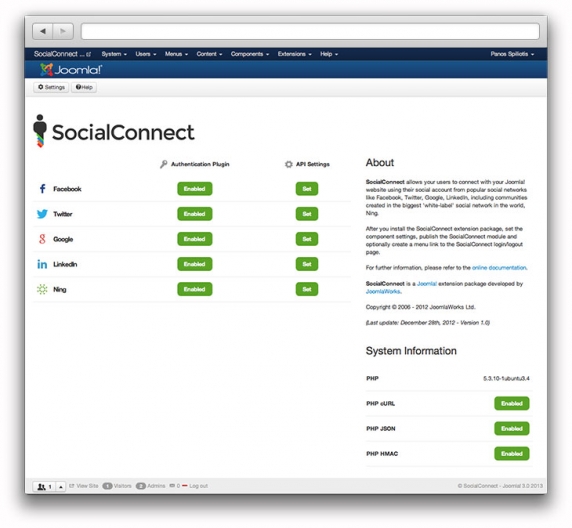
SocialConnect is the only Joomla extension that allows you to integrate your Joomla site with social networks and identity providers for user authentication, posting content directly to social networks and 3rd-party comment system integration.